Tensorflowのオブジェクト検出APIをインストールしてサンプルプログラムを動かしてみました。
環境は「深層学習 Ubuntu 20.04 に Tensorflow GPU をインストール」の環境を使いました。
<<インストール>>
基本的にはリンク先のチュートリアルに沿っています。
TensorFlow 2 Object Detection API tutorial
https://tensorflow-object-detection-api-tutorial.readthedocs.io/en/latest/install.html
「深層学習 Ubuntu 20.04 に Tensorflow GPU をインストール」の環境にインストールします。説明が省略された部分は、「深層学習 Ubuntu 20.04 に Tensorflow GPU をインストール」を参考にしてください。
1. Anaconda Python 3.8 (Optional)
1.1 Anaconda Python 3.8 インストール
すでにインストール済みの既存の環境にインストールするので省略します。
1.2 Create a new Anaconda virtual environment
仮想環境でpython は3.9 としました。
~$ conda create -n tfod pip python=3.9
tfodは仮想環境名です。
仮想環境アクティブ
~$ conda activate tfod
2. TensorFlow Installation
2.1 Install the TensorFlow PIP package
チュートリアルの通り、tensorflow 2.5.0をインストール。
~$ pip install –ignore-installed –upgrade tensorflow==2.5.0
実行結果
・・・・
Successfully installed MarkupSafe-2.1.3 absl-py-0.15.0 astunparse-1.6.3 cachetools-5.3.1 certifi-2023.7.22 charset-normalizer-3.2.0 flatbuffers-1.12 gast-0.4.0 google-auth-2.22.0 google-auth-oauthlib-0.4.6 google-pasta-0.2.0 grpcio-1.34.1 h5py-3.1.0 idna-3.4 importlib-metadata-6.8.0 keras-nightly-2.5.0.dev2021032900 keras-preprocessing-1.1.2 markdown-3.4.4 numpy-1.19.5 oauthlib-3.2.2 opt-einsum-3.3.0 protobuf-3.20.3 pyasn1-0.5.0 pyasn1-modules-0.3.0 requests-2.31.0 requests-oauthlib-1.3.1 rsa-4.9 setuptools-68.0.0 six-1.15.0 tensorboard-2.11.2 tensorboard-data-server-0.6.1 tensorboard-plugin-wit-1.8.1 tensorflow-2.5.0 tensorflow-estimator-2.5.0 termcolor-1.1.0 typing-extensions-3.7.4.3 urllib3-1.26.16 werkzeug-2.3.7 wheel-0.38.4 wrapt-1.12.1 zipp-3.16.2
2.2 Verify your Installation
チュートリアルの通りに結果を確認
~$ python -c “import tensorflow as tf;print(tf.reduce_sum(tf.random.normal([1000, 1000])))”
実行結果
・・・・
2023-09-09 13:55:05.849902: E tensorflow/stream_executor/cuda/cuda_driver.cc:328] failed call to cuInit: CUDA_ERROR_NO_DEVICE: no CUDA-capable device is detected
2023-09-09 13:55:05.849945: I tensorflow/stream_executor/cuda/cuda_diagnostics.cc:156] kernel driver does not appear to be running on this host (on-LM-iH700): /proc/driver/nvidia/version does not exist
2023-09-09 13:55:05.850441: I tensorflow/core/platform/cpu_feature_guard.cc:142] This TensorFlow binary is optimized with oneAPI Deep Neural Network Library (oneDNN) to use the following CPU instructions in performance-critical operations: AVX2 FMA
To enable them in other operations, rebuild TensorFlow with the appropriate compiler flags.
tf.Tensor(1086.3253, shape=(), dtype=float32)
“no CUDA-capable device is detected” とありますが、とりあえず今回はGPU関連のインストールを省略します。
3. GPU Support (Optional)
GPU設定については今回はとりあえず省略します。
4. TensorFlow Object Detection API Installation
ここからが、TensorFlow Object Detection API のインストールです。
4.1 Downloading the TensorFlow Model Garden
Zipで適当な場所にダウンロードしました。
ダウンロードファイル models-master.zip
ディレクトリTensorflow/modelsを作ってmodels-masterの中身をコピーしました。
4.2 Protobuf Installation/Compilation
Protobufをインストールするらしいです。
ダウンロードページ
https://github.com/protocolbuffers/protobuf/releases
環境にあったファイルをダウンロード
protoc-24.2-linux-x86_64.zip
展開して仮想環境に protobuf フォルダを作って中身をコピー
.bashrcにパスを設定
export PATH=”~/anaconda3/envs/tfod/protobuf/bin:$PATH”
ターミナル再起動。
オブジェクト検出APIをコピーしたディレクトリの Tensorflow/models/research/に移動して、
チュートリアルに書いてあるコマンド実行。
~$ protoc object_detection/protos/*.proto –python_out=.
4.3 COCO API installation
COCO API をインストールするそうです。
まず、チュートリアルの通りにインストール。
~$ git clone https://github.com/cocodataset/cocoapi.git
~$ cd cocoapi/PythonAPI
~$ make
~$ cp -r pycocotools
(チュートリアルでは”TensorFlow”で大文字になっています。)
これを仮想環境で実行したら何故かエラーが出たので、
一旦、仮想環境から外れてmake したらインストールできました。
4.4 Install the Object Detection API
準備ができましたので、オブジェクト検出APIのインストールです。
Tensorflow/models/researchに移動して、チュートリアルの通りにコマンド実行。
~$ cp object_detection/packages/tf2/setup.py .
~$ python -m pip install .
4.5 Test your Installation
インストールの確認です。
~$ python object_detection/builders/model_builder_tf2_test.py
実行結果
・・・・
I0909 15:25:44.349308 140385200484736 test_util.py:2462] time(__main__.ModelBuilderTF2Test.test_unknown_meta_architecture): 0.0s
[ OK ] ModelBuilderTF2Test.test_unknown_meta_architecture
[ RUN ] ModelBuilderTF2Test.test_unknown_ssd_feature_extractor
INFO:tensorflow:time(__main__.ModelBuilderTF2Test.test_unknown_ssd_feature_extractor): 0.0s
I0909 15:25:44.350016 140385200484736 test_util.py:2462] time(__main__.ModelBuilderTF2Test.test_unknown_ssd_feature_extractor): 0.0s
[ OK ] ModelBuilderTF2Test.test_unknown_ssd_feature_extractor
———————————————————————-
Ran 24 tests in 25.349s
OK (skipped=1)
これでインストール出来ました。
<<サンプル実行>>
以下のページのサンプルを JupyterNotebook で実行してみました。
Object Detection From TF2 Saved Model
https://tensorflow-object-detection-api-tutorial.readthedocs.io/en/latest/auto_examples/plot_object_detection_saved_model.html#sphx-glr-auto-examples-plot-object-detection-saved-model-py
1. Download the test images
チュートリアルの Download the test images と書かれたサンプルを実行したら以下のエラーがでました。
エラー
module ‘numpy’ has no attribute ‘typeDict’
下記のページを参考にして対応
https://stackoverflow.com/questions/74852225/attributeerror-module-numpy-has-no-attribute-typedict
numpy のバージョンを確認
import numpy as np
print(np.__version__)
結果
1.24.3
Numpyのバージョンを適当に変更してみました。
~$ pip install numpy==1.23
サンプル実行結果
———————————————–
・・・・
Downloading data from http://raw.githubusercontent.com/tensorflow/models/master/research/object_detection/test_images/image1.jpg
129862/129862 [==============================] – 0s 0us/step
Downloading data from http://raw.githubusercontent.com/tensorflow/models/master/research/object_detection/test_images/image2.jpg
1415684/1415684 [==============================] – 0s 0us/step
・・・・
とりあえず、最初のサンプルは動きました。
2. Download the model
実行結果
Downloading data from http://download.tensorflow.org/models/object_detection/tf2/20200711/centernet_hg104_1024x1024_coco17_tpu-32.tar.gz
1426460092/1426460092 [==============================] – 298s 0us/step
問題なく動作
3. Download the labels
実行結果
Downloading data from https://raw.githubusercontent.com/tensorflow/models/master/research/object_detection/data/mscoco_label_map.pbtxt
5056/5056 [==============================] – 0s 0us/step
問題なく動作
4. Load the model
実行結果
Loading model…
・・・・
WARNING:absl:Importing a function (__inference_batchnorm_layer_call_and_return_conditional_losses_53414) with ops with unsaved custom gradients. Will likely fail if a gradient is requested.
このWARNINGはサンプルページでも出でます。
5. Load label map data (for plotting)
実行結果表示なし
6. Putting everything together
実行結果
エラーがでました。
ttributeError: ‘ImageFont’ object has no attribute ‘getbbox’
参考
https://github.com/tensorflow/models/issues/11047
とうやらPillowの問題のようです。
インストール
pip install pillow==9.5
jupyternotebookカーネル再起動
再度実行
エラーはとれましたが、結果のウィンドウが表示されません。
JupyterNotebookでの実行なので以下のコマンドを追加しました。
%matplotlib inline
実行結果
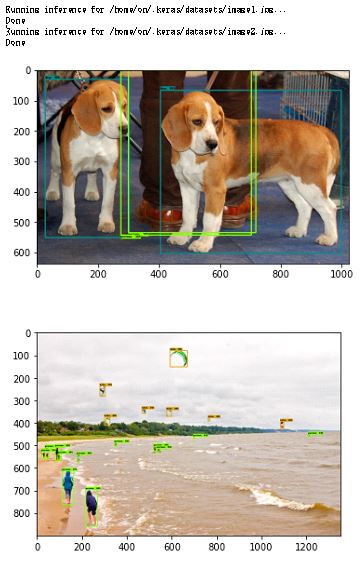
サンプル画像のオブジェクトが検出されています。
(2023/09/18 Shin Onda)
