前回 Ubuntu にインストールしたので、
今度は Tensorflowオブジェクト検出APIを開発環境の無い Windows10 にインストールしてみました。
開発環境の無い一般向けのWindowsなので、後述の通り Git や VisualStudio などの開発ツールをインストールする必要があります。
(GPU設定については今回はとりあえず省略します。)
<<インストール>>
基本的にはリンク先のチュートリアルに沿っています。
TensorFlow 2 Object Detection API tutorial
https://tensorflow-object-detection-api-tutorial.readthedocs.io/en/latest/install.html
1. Anaconda Python 3.8 (Optional)
1.1 Anaconda Python 3.8 インストール
Anaconda をインストールします。
https://www.anaconda.com/download
Anaconda3-2023.09-0-Windows-x86_64.exe をダウンロード、後は起動してGUIインストーラの通り。
condaバージョン確認
(base) C:\(userdir)>conda -V
conda 23.7.4
1.2 Create a new Anaconda virtual environment
Anaconda promptより仮想環境 tfod を作成。python は3.9 としました。
(base) C:\(userdir)>conda create -n tfod pip python=3.9
仮想環境アクティブ
(base) C:\(userdir)\anaconda3\envs\tfod>conda activate tfod
(tfod) C:\(userdir)\anaconda3\envs\tfod>
バージョン確認
(tfod) C:\(userdir)\anaconda3\envs\tfod>python -V
Python 3.9.18
仮想環境に Python 3.9.18 がインストールされています。
2. TensorFlow Installation
2.1 Install the TensorFlow PIP package
PIPでTensorFlowをインストール
(tfod) C:\(usedir)\anaconda3\envs\tfod>pip install –ignore-installed –upgrade tensorflow==2.5.0
・・・
Collecting tensorflow==2.5.0
Downloading tensorflow-2.5.0-cp39-cp39-win_amd64.whl (422.6 MB)
・・・
3. GPU Support (Optional)
GPU設定については今回はとりあえず省略します。
4. TensorFlow Object Detection API Installation
TensorFlow Object Detection API のインストール。
4.1 Downloading the TensorFlow Model Garden
Zipをダウンロード
https://github.com/tensorflow/models/archive/master.zip
展開して、Tensorflow\modelsフォルダを作成してmodels-masterの内容をコピーしました。
4.2 Protobuf Installation/Compilation
Protobufをインストール。
ダウンロードページ
https://github.com/protocolbuffers/protobuf/releases
Windwos用をダウンロード
protoc-24.3-win64.zip
C:\(userdir)\protobufに展開、環境変数にパス設定、仮想環境再起動
オブジェクト検出APIをコピーしたディレクトリの Tensorflow/models/research/に移動して、
チュートリアルに書いてあるコマンド実行。
(tfod) C:\(userdir)\anaconda3\envs\tfod\models\research>protoc object_detection/protos/*.proto –python_out=.
4.3 COCO API installation
COCO API をインストール。
まず cython からインストール
(tfod) C:\(userdir)\anaconda3\envs\tfod\pip install cython
Installing collected packages: cython
Successfully installed cython-3.0.2
チュートリアルには、VC++2015 Build tools が必要と書いてあります。
“Note that, according to the package’s instructions, Visual C++ 2015 build tools must be installed and on your path. If they are not, make sure to install them from here.”
一般向け Winodows PC なので必要な開発環境がありません。
まず、GITからインストールしました。
参考
https://www.curict.com/item/60/60bfe0e.html
公式
https://gitforwindows.org/
Windows64bit版 Git-2.42.0.2-64-bit.exe をダウンロードしてインストール。
VC++2015インストール
チュートリアルの”from here”のリンク先では正常にインストールできなかったので、
Webページを参考にして、vs_BuildTools.exe, visualcppbuildtools_full.exe
などをダウンロードしてインストールしてみました。
https://visualstudio.microsoft.com/ja/visual-cpp-build-tools/
https://go.microsoft.com/fwlink/?LinkId=691126
準備ができましたの COCOAPI のインストールをします。
(tfod) C:\(userdir)\anaconda3\envs\tfod>pip install git+https://github.com/philferriere/cocoapi.git#subdirectory=PythonAPI
・・・
Collecting git+https://github.com/philferriere/cocoapi.git#subdirectory=PythonAPI
・・・(中略)
Successfully built pycocotools
Installing collected packages: pycocotools
Successfully installed pycocotools-2.0
インストールされたようです。
4.4 Install the Object Detection API
ようやく準備ができましたので、オブジェクト検出APIのインストールです。
(tfod) C:\(userdir)\anaconda3\envs\tfod\Tensorflow\models\research>copy object_detection\packages\tf2\setup.py .
(tfod) C:\(userdir)\\anaconda3\envs\tfod\Tensorflow\models\research>python -m pip install .
(tfod) C:\(userdir)\\anaconda3\envs\tfod\Tensorflow\models\research>python object_detection/builders/model_builder_tf2_test.py
・・・(メッセージ一部抜粋)
2023-10-07 07:29:00.747795: W tensorflow/stream_executor/platform/default/dso_loader.cc:64] Could not load dynamic library ‘cudart64_110.dll’; dlerror: cudart64_110.dll not found
2023-10-07 07:29:00.747947: I tensorflow/stream_executor/cuda/cudart_stub.cc:29] Ignore above cudart dlerror if you do not have a GPU set up on your machine.
Traceback (most recent call last):
File “C:\(userdir)\anaconda3\envs\tfod\Tensorflow\models\research\object_detection\builders\model_builder_tf2_test.py”, line 24, in
from object_detection.builders import model_builder
File “C:\(userdir)\anaconda3\envs\tfod\lib\site-packages\object_detection\builders\model_builder.py”, line 23, in
from object_detection.builders import anchor_generator_builder
File “C:\(userdir)\anaconda3\envs\tfod\lib\site-packages\object_detection\builders\anchor_generator_builder.py”, line 26, in
from object_detection.protos import anchor_generator_pb2
ImportError: cannot import name ‘anchor_generator_pb2’ from ‘object_detection.protos’ (C:\(userdir)\envs\tfod\lib\site-packages\object_detection\protos\__init__.py)
GPUのウォーニングはGPU環境を設定してないので良いのですが、
最後に、エラーが出ました。
下記を参考にして対処してみました。
https://qiita.com/kappanda/items/697ba3c6625774d3414c
https://github.com/tensorflow/models/issues/1595
https://qiita.com/johnpapapa/items/e7e06f2480251102d16d
チュートリアルのリンク先から
https://github.com/protocolbuffers/protobuf/releases
protobuf-24.3 をダウンロードして展開。
protobuf-24.3\python\google\protobuf\internal
から
C:\(userdir)\anaconda3\envs\tfod\Lib\site-packages\google\protobuf\internal
に足りないソース builder.py をコピーして解消しました。
Ubuntuにくらべて問題が多くて苦労しましたが、試行錯誤して、なんとかエラーは解消されました。
<<サンプル実行>>
サンプルソースをダウンロードしてコマンドプロンプトから実行してみました。
https://tensorflow-object-detection-api-tutorial.readthedocs.io/en/latest/auto_examples/index.html#examplesplot_object_detection_saved_model.py
サンプルプログラムはこのままだと Anaconda コマンドプロンプトの実行では画像ウィンドウが表示されないので、
plt.imshow の代わりに OpenCV で表示するように修正しました。
plot_object_detection_saved_model.py の変更箇所
一部抜粋 ———————–
import cv2
(中略)
plt.figure()
plt.imshow(image_np_with_detections)
#↓これを追加
orgname = os.path.splitext(os.path.basename(image_path))[0]
cv2.namedWindow(orgname)
cv2.imshow(orgname, cv2.cvtColor(image_np_with_detections, cv2.COLOR_RGB2BGR))
#↑これを追加
plt.show()
#↓これを追加
cv2.waitKey(0)
#↑これを追加
————————————
実行結果
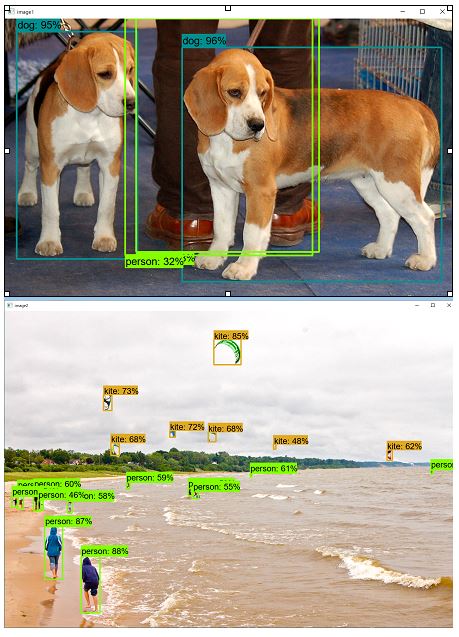
いろいろと問題ありましたが、なんとか実行できるようになりました。
(2023/11/04 Shin Onda)
